


Picking up stitches in the Gap of an Afterthought Thumb
For the Ghostwood Mittens (and most other mittens too)
Over the summer I ran a test knit for my most recent pattern, the Ghostwood Mittens. I was lucky enough to have 8 volunteer knitters trying out the pattern and I got lots of great feedback. Thank you testers!
One question I got asked more than once during the test knit was "what is the best way to pick up the stitches in that darn gap?!?" Ok, no one actually said darn, but that's what I say when I refer to these gaps, because sometimes they can seem a bit annoying to deal with.
There are a number of great resources out there for working an afterthought thumb, however I couldn't find much on how other knitters deal with the gaps that are created on each side of the thumb opening. Most tutorials I've come across merely say "pick up 1-2 stitches in gap..." which is fine, but where does one specifically pick up these stitches to have a neat looking thumb?!?! There's definitely more than one way to do it, and I'm sure every knitter has their own method, so in this photo tutorial, I'll show you how I prefer to do it.
Ok, let's get started!
Oh wait, first a brief note: This tutorial starts from the point where stitches are transferred from waste yarn to needles from around the thumb opening. For info on how to work these stitches with waste yarn, please use one of these great resources. The stitch counts mentioned here pertain to size 1 and size 2 of the Ghostwood Mittens. These instructions will also work for size 3 of the pattern (and most other mitten patterns using an afterthought thumb), just plug in the appropriate numbers. Worsted weight yarn is used in this tutorial, however nothing else about gauge will be mentioned :)
TUTORIAL BEGINS
You Will Need:
A pair of Ghostwood mittens (or other mittens) with thumb stitches knit in waste yarn as per the Afterthought thumb method
A set of 4 double pointed needles (dpns)
Yarn for working the thumb
Stitch marker
So, you've already worked 5 stitches in waste yarn (the green stitches shown here) for your afterthought thumb opening and have completed the hand portion of your mitten. You should have something that looks like this (below):

2. With a double pointed needle (dpn), carefully pick up the right leg of each stitch in the row BELOW your waste yarn.
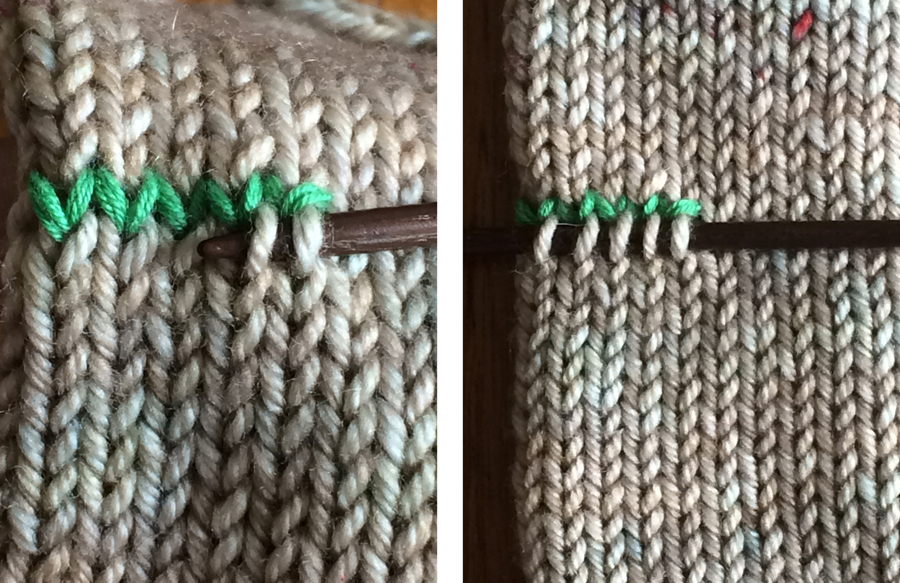
3. With another dpn, pick up the right leg of each stitch in the row ABOVE your waste yarn. There are now 5 stitches on your lower needle, and 5 stitches on your top needle.


4. Very carefully, remove the waste yarn stitch by stitch. I like to use a dpn for this.
5. There are now 5 stitches on the dpn below the opening, and 5 stitches on the dpn above the opening. When you spread the needles apart, you can really see those darn gaps on each side.

6. Grab a new dpn and your yarn and join by knitting across the 5 bottom stitches (I'm using a somewhat contrasting colour yarn here to make things a bit easier to see). Leave a tail at the beginning for weaving in later. This tail can also be helpful later for closing up any holes formed by loose stitches. Tuck the tail to the inside of your work to keep it out of the way.

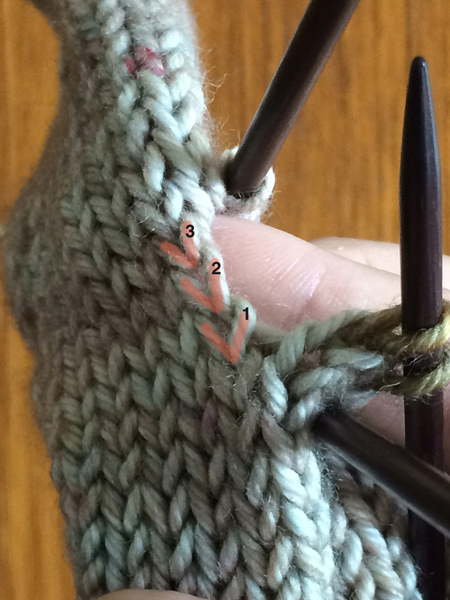
7. You are now ready to pick up and knit stitches in the first gap! When you investigate closely, you will see 3 stitches bordering the left-hand side of the thumb opening. I've highlighted them in red.
8. With a new dpn, insert the needle tip into stitch 1 from front to back, picking up the right leg of the stitch onto your needle and pull a loop of working yarn through to make a new stitch. Skip over stitch 2, and insert needle tip in to stitch 3 and pick up one stitch as you did before with stitch 1. You now have two new stitches on your needle!


9. With a new dpn, knit across the 5 top stitches. Now you are at the second gap! Again, there are 3 sts bordering the right side of the thumb opening.
10. Like you did with the first gap, pick up a stitch by inserting your needle tip into stitch 1 from front to back, but this time pick up the left leg on to your needle and pull a loop of yarn through to make a stitch. Skip stitch 2 and pick up and knit a stitch in stitch 3 as you did with stitch 1.


You know have 14 stitches total over your needles!
11. At this point it is best to evenly rearrange your stitches over your dpns. You will also need to place a marker for the beginning of the round. This is how I set it up (I prefer working with 4 dpns when doing small circumference things like thumbs, however if you feel more comfortable with a 5th needle, that works too!)
Needle 1: 2 stitches
Needle 2: 5 stitches
Needle 3: 5 stitches
Needle 4 (working needle): 2 stitches. When you begin knitting the marker will be securely in the centre of the former needle 4.
12. And now you are ready to continue knitting the rest of the thumb! I find picking up the stitches in this way creates a pretty good thumb that flows fairly smoothly from the mitten. If there are any loose or uneven stitches at the base of your thumb, jiggle the stitch next to it to help even it out, or... remember that tail? When you're weaving it in on the wrong side, use it to close up any holes.

If your thumb base still looks a bit sloppy, don't worry too much about it. The thumb base is quite inconspicuous and I'm sure most people would never notice.

Hope you found this tutorial helpful! If you have further questions, please don't hesitate to contact me :)
Happy knitting!
-Kiyomi
